Thursday, December 5, 2013

December Blog Hop

Welcome to our December blog hop: Joyful Christmas Wishes! This month, our hop is featuring 3-D items or gift wrapping/packaging ideas using our wonderful Stampin' Up products.  I just wrapped up classes on this little gem of a banner.  My crafty friends and I made several types of banners using the Simply Created Christmas Banner Kits.  Some chose to create "Joy", "Joyful", "Peace", "Merry", and "Noel".  I can't tell you how much I absolutely LOVE these kits, and I will be super sad if they are not carried over into the new mini-catalog season!  Get them while you can (only until January 2nd!)!


Recipe:
Simply Created Banner Kit
Simple Created Christmas Banner Accessory Kit
Pool Party reinker (misters)
Bermuda Bay reinker (misters)
Smoky Slate ink pad w/sponge dauber (lettering)
hot glue gun
sticky strip
(LOTS of ribbon tying patience!!!) :)

Another project I saw on YouTube the other day was this adorable "Cracker" gift box.  I got to use my Scoreboard and the new Envelope Punch board to create this fun little gift!  Using the Season of Style DSP stack, I took one sheet of 4 1/2" x 6 1/2" paper and scored it lengthwise at 1", 2", 3", & 4".  I turned it the opposite way, and scored at 1", 1 1/2", & 2", then again at 4 1/2", 5", & 5 1/2".  After that, I pre-folded all scores.  Then, I got out the envelope punch board and lined up the project on the 6 1/2" length side with 1 1/2" and punched, then again at 5" and punched.  I folded that row over, and continued with 1 1/2" and 5" punching all the way to the bottom (DO NOT punch the tiny side for adhesive).  I used sticky strip to adhere the small flap side, then pushed the ends together and tied ribbon on to keep the goodies inside.  (Hope this makes sense.) 

 Recipe:
Envelope Punch Board
Score Board
Season of Style DSP Stack
Sticky Strip
Gumball Green ink
Very Merry Tags (bah hum bug stamp)
Artisan Label punch
Cherry Cobbler Seam Binding
Linen Thread


Thanks for stopping by, and have a very Merry Christmas!!!  Next, please visit Too Cool Stamping!

Too Cool Stamping Stamping With Pearl


Wednesday, November 6, 2013

Holiday Blog Hop


 Welcome to the Holiday Blog Hop!  I'm so glad you could join us, and I hope you've been inspired with lots of amazing projects!  You should be joining us from Stamping with Pearl.Remember, you can order supplies for any project you see here, from your Stampin' Up Demonstrator!  Happy Hopping!!!


The first project I want to share with you today, was made using the amazing Stampin' Up Simply Created Banner Kits.  It's November, and there are so many things to be thankful for!  I hope this inspires you!


 Thankful Banner Recipe:
Simply Created Banner Kit
Cajun Craze Cardstock and Reinker (Stampin' Spritzer)
Crushed Curry Cardstock and Reinker (Stampin' Spritzer)
Gumball Green Cardstock and Reinker (Stampin' Spritzer)
Chocolate Chip Cardstock and Reinker (Stampin' Spritzer)
Early Espresso Ink pad and Sandable Cardstock
Sweater Weather Designer Series Paper
Autumn Accents Bigz leaf die
Designer Rosette Bigz LX die
Woodgrain Embossing Folder
Argyle Embossing Folder
Chevron Embossing Folder
1 3/4" Circle Punch (stabilizer on rosettes)
Linen Thread (bows on leaf bundles)
Naturals Designer Buttons (leaf bundles)
Vintage Faceted Designer Buttons (leaf bundles)
Sponge Dauber (for lettering)
Sticky Strip Adhesive
Glue Gun/sticks
Bobby Pins (to make leaves and rosettes detachable)

I hope you like the banner!  Moving on to my second project, I made this Thanksgiving card to send to some family. 


 Here's the recipe:
Crumb Cake card base
Sweater Weather DSP
Chocolate Chip Cardstock (cut into a "v")
Very Vanilla Cardstock (sentiment and turkey)
Soft Sky Cardstock (under turkey)
Seasonal Sayings (Thanks is for Giving stamp)
Harvest of Thanks Stamp Set (turkey)
Deco Labels Collections (die)
Circles Collection (turkey and layers)
Dimensionals
Burlap Ribbon
Baked Brown Sugar ink pad


 I hope you enjoyed your stop on this hop!  Up next, please visit
  Too Cool Stamping (Angie)


http://stampingwithpearl.blogspot.com/2013/10/november-holiday-blog-hop.html


 1.              Stampin’ Grandma(Sherry)

2.         The Flying Stamper (Deb)


5.         Stamping with Pearl (Pearl)

6. YOU ARE HERE---  Scrapper Frog (Cindy) 


Tuesday, October 1, 2013

Fall Blog Hop


Welcome to the Fall Blog Hop!  You are right in the middle of the hop, and I'm so glad you joined us!  Here's a fun Halloween card I made!  I hope you like it!


Recipe:  
Bootiful Occasions stamp set
Whisper White Cardstock (base & small oval)
Elegant Eggplant Cardstock (top of card)
Witches' Brew DSP
Basic Black Cardstock (large oval)
Chevron Embossing Folder
Ovals Collection Framelits
Jet Black Staz-On (boot)
Stampin' Write Markers: Tangerine Tango, Summer Starfruit, Rich Razzleberry (boot)
Rhinestone Basic Jewels


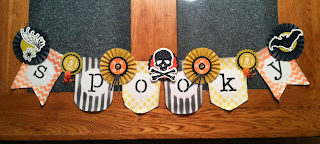
Here's a sneak of our fun Friday "Spooky Banner Class"!


Recipe:
Build a Banner Simply Created Kit
Halloween Banner Simply Created Accessory Kit
Tangerine Tango Reinker (spritzer)
Summer Starfruit Reinker (spritzer)
Basic Black Reinker (spritzer)
Sticky Strip (rosettes)
Houndstooth Embossing Folder
Scallop Circles
Dimensionals
Glue Dots
Hot Glue Gun/Glue


I hope you enjoy the rest of the hop!  ~Hoppy Crafting!

In case you missed us from the beginning, here's the list of participants for the Fall Blog Hop:


1.         Stampin’ Grandma (Sherry) http://stampingrandma.blogspot.com/

2.         The Flying Stamper (Deb) http://flyingstamper.blogspot.com/

3.         Olivia Loves to Stamp (Olivia) http://oliviastamps.blogspot.com/

4.         Scrappy Stamps and Ink (Nichole) www.scrappystampsandink.blogspot.com

5.         Stamping with Pearl (Pearl) www.stampingwithpearl.blogspot.com

6.         You are here--->  Scrapper Frog (Cindy) http://scrapperfrogcindy.blogspot.com/

7.         Crafty Tam (Tammy)  www.tamsdigiworld.blogspot.com/

8.         Too Cool Stamping (Angie) http://www.toocoolstamping.com/

9.        Stamping Creations with Rachelle (Rachelle) http://www.stampinwithrachelle.blogspot.com/  
10.    Simple & Creative Corner (Tina) http://thesimpleandcreativecorner.blogspot.com/

11.            Stampin with Darla and Sisters (Darla & Nancy) http://stampinwithdarlaandsisters.blogspot.com/

Friday, September 27, 2013

Halloween Happiness...again!


I can't get over how stinkin' cute and versatile this "Halloween Happiness" stamp is from Stampin' Up in the new Holiday catalog!  I have used it on several projects, and love it!

Here's the recipe:
Halloween Happiness stamp
Pumpkin Pie Stampin' Write Marker
Gumball Green Stampin' Write Marker
Basic Black ink pad
Basic Black cardstock (scallop)
Gumball Green Cardstock (base)
Pumpkin Pie DSP
Whisper White cardstock
Pumpkin Pie ink pad +sponge dauber (edges)
Dimensionals (pop up white w/pumpkins)
Scallop Edge Punch (black cardstock)
Corner Rounder (white edges)

~Hoppy Crafting!

Tuesday, September 24, 2013

Birthday Celebration

I  made this fun birthday card, using the Stampin' Up "Simply Sketched" stamp set and the new SU Sweater Weather DSP.  I love how the Crushed Curry makes it so cheerful. 

Here's the Recipe:
Sketched Birthday stamp set (hats & celebrate)
Banner Framelits
Crushed Curry base
Summer Starfuit Ribbon
Dazzling Diamonds Glitter (tops of hats)
SU 2-Way Glue
Strips Embossing Folder (White)

~Hoppy Crafting!

Saturday, September 14, 2013

Lovely Wagon

Here's a sweet card for a good friend.  I used Stampin' Up's "For The Birds" stamp set for the image and colored it in.  I thought that offsetting the squares on the cloud embossing folder really made a cute look.  I used Daffodil Delight and Marina Mist for the card layers.  ~Hoppy Crafting!

Tuesday, September 10, 2013

Lobster Lovin'

I LOVE this "By The Tide" stamp set from Stampin' Up!  Here's a card that I recently designed for stamp class.  I used the new Bermuda Bay cardstock, along with some Midnight Muse as a torn accent. 
The lobster is a little tricky to cut out, but looks amazing when you take the time and add dimensionals!  I would really recommend trying it!  ~Hoppy Crafting!

Thursday, September 5, 2013

Secret Garden

I used the Secret Garden stamp set and coordinating Secret Garden Framelits Dies to create this card.  After stamping each of the flowers, I used a sponge dauber to create a soft look of color on the main flower element.  I hope you like it!  ~Hoppy Crafting!

Sunday, September 1, 2013

Fright Night Blog Hop


 Vvvel-come, to the Fright Night Blog Hop!  I'm glad you could join us in showcasing some amazing and fun projects, using Stampin' Up! This should be your 7th stop!  If not, you can start here, at Stampin' Grandma's blog.   I hope you enjoyed your previous stop at Terry's "Goin' Over the Edge" blog!
 
Today, I want to share with you a fun project that I made, using the new stamps "Halloween Happiness" and "Magnificent Maple" in the Stampin' Up Holiday Catalog!  This a basic A2-sized card, with some fun touches!  I hope it inspires you!  

Here's the recipe ingredients:  
Halloween Happiness Stamp
Magnificent Maple Stamp
Staz-On White ink pad (maple leaves on basic black cardstock)
Pumpkin Pie Stampin' Write Marker (pumpkins)
Old Olive Stampin' Write Marker (pumpkin stems)
Staz-On Jet Black ink pad (greeting)
Tangerine Tango cardstock (card base)
Basic Black cardstock (layer)
Sweater Weather Designer Series Paper (strip under button)
Whisper White cardstock (pumpkins and greeting)
Naturals Designer Buttons (one tied in with the Linen Thread)
Natural Linen Thread(wrapped around Sweater Weather DSP and Basic Black cardstock)
Dimensionals (behind the Whisper White that the pumpkins are on)

Your next (and final) stop is Tammy at Crafty Tam!

      ~Hoppy Crafting!


http://goinovertheedge.blogspot.com
http://tamsdigiworld.blogspot.com/


In case you found my blog without the Fright Night Blog hop, and would like to visit everyone (and, why wouldn't you?!?), here's a complete list of the hop!


Olivia Loves to Stamp-http://oliviastamps.blogspot.com/

Scrappy Stamps and Ink-www.scrappystampsandink.blogspot.com


Goin’ over the Edge- http://goinovertheedge.blogspot.com

You are here--->Scrapper Frog- http://scrapperfrogcindy.blogspot.com/


Tuesday, August 27, 2013

Embroidery Hoop Mini Bulletin Boards

I saw these lovely yellow embroidery hoops at the store the other day, and decided to use some leftover fabric from my classroom curtains and bulletin board, to make some mini-cork board bulletin boards. 
I traced a larger circle and cut fabric, cork board, and a cardboard backing for each before assembling.  Then I stretched and stretched, and stretched the fabric, until each hoop was tight. 
Next, I made sure each cork circle fit, and added hot glue, evenly, then pressed it in against the fabric. 
After that, I hot glued in the cardboard backing.  Finally, I took the excess fabric on the back, and hot glued it to the backing, to ensure it wouldn't come off.  I hung each up by a nail in a random configuration.  ~Hoppy Crafting!

Tuesday, August 20, 2013

Banners for School

Ohh....emmm....Geeee!!!  I am so in L-O-V-E with the NEW Stampin' Up Build a Banner Kit in the new Holiday Mini Catalog!!!!  In just one day, I seriously got my mist and daub on!  (Yes, I'm craft-geeky, and I know it!) I used EVERY SINGLE BANNER in BOTH the Build a Banner Kit, AND the Banner Refill Kit!  That's almost 40 banners, people!
One of the projects I worked on, besides the super secret Halloween and Christmas ones, was to make some banners to decorate my classroom.  I used lovely chevron and polka dot stencils for the Smoky Slate and Daffodil Delight (mixed with a tad of Summer Starfruit) pennants.  For the letters, I attempted the mini-mister for the "learn" banner, but loved the control I had, using the sponge daubers on the "read" and "grow" banners.  For all three, I used Gumball Green.  The "Learn" banner is also outlined in a black Sharpie, because I couldn't stand how undefined the letters were by misting them.
I used the 3/4" Smoky Slate Chevron ribbon to string each pennant on, and tied a loop at each end to be able to hang them up.  Hope you like them!


Here's a quick look at the Simply Created Build a Banner Kit.  It includes the Chevron, Striped, and Polka Dot masks, as well as a blank shield, and all 26 letters of the alphabet.  There are 18 pennants, jute twine, and a mini-mister.  The easiest way I found, was to fill a mister with approximately 25-30 drops of reinker (to achieve desired color), and fill the rest with 70% Isopropyl (rubbing) alcohol.  I also covered all of my surface with newspaper, and had several sheets of paper towel handy to wipe masks as I finished with them.  When I was completely finished, I washed all masks in the sink, and then let dry. 

~Hoppy Crafting!